本文共 8839 字,大约阅读时间需要 29 分钟。
找我解决100元。
环境:Android Studio 3.4.1
一、总结: Eclipse转为Android Studio步骤
1.直接导入,有时候直接OK。新3.4.1后都不行了。
2.如有报错,新建一个新正常项目。把两具build.gradle全部替换成正常的。我都放下面了。

build.gradle文件(Module:app)
apply plugin: 'com.android.application'android { compileSdkVersion 28 defaultConfig { applicationId "com.example.xhrrj.myapplication" minSdkVersion 15 targetSdkVersion 28 versionCode 1 versionName "1.0" testInstrumentationRunner "android.support.test.runner.AndroidJUnitRunner" } buildTypes { release { minifyEnabled false proguardFiles getDefaultProguardFile('proguard-android.txt'), 'proguard-rules.pro' } }}dependencies { implementation fileTree(dir: 'libs', include: ['*.jar']) implementation 'com.android.support:appcompat-v7:28.0.0' implementation 'com.android.support.constraint:constraint-layout:1.1.3' testImplementation 'junit:junit:4.12' androidTestImplementation 'com.android.support.test:runner:1.0.2' androidTestImplementation 'com.android.support.test.espresso:espresso-core:3.0.2'} build.gradle文件(Project:工程名)
// Top-level build file where you can add configuration options common to all sub-projects/modules.buildscript { ext.kotlin_version = '1.3.31' repositories { google() jcenter() } dependencies { classpath 'com.android.tools.build:gradle:3.4.1' classpath "org.jetbrains.kotlin:kotlin-gradle-plugin:$kotlin_version" // NOTE: Do not place your application dependencies here; they belong // in the individual module build.gradle files }}allprojects { repositories { google() jcenter() }}task clean(type: Delete) { delete rootProject.buildDir} 3.其它错误 按下面的方法解决。需要下载的直接下载。
二、Android Studio导入项目时常见问题的解决汇总
0、一些重要目录位置
C:\Users\xhrrj\.gradle\wrapper\dists\gradle-5.1.1-all
C:\Program Files\Android\Android Studio\gradle\m2repository\com\android\tools\build\gradle\3.4.1
1、Failed to open zip file问题
原因:gradle*****.zip文件损坏。删了重新自动下载或换个版本,或手工下载。
新建一个项目,如果成功的话,就打开gradle/wrapper/gradle-wrapper.properties复制
distributionUrl=https\://services.gradle.org/distributions/gradle-4.6-all.zip
把你项目里的这个替换掉就OK了。
也可以自己手工下载对应版本放在目录C:\Users\xhrrj\.gradle\wrapper\dists

手工下载比如:
2、Failed to find Build Tools revision 26.0.2 Install Build Tools 26.0.2 and sync project
直接更新install吧。按提示差什么装什么就完了。一般都是配置文件报错。
3、Gradle打包:Keystore not found for signing config,含签名,但又缺少签名文件。
删除就行signingConfig signingConfigs.release

3、jcenter.bintray.bintray.com找不到资源
ERROR: Could not find com.android.tools.build:gradle:3.4.1.
Searched in the following locations: - https://jcenter.bintray.com/com/android/tools/build/gradle/3.4.1/gradle-3.4.1.pom - https://jcenter.bintray.com/com/android/tools/build/gradle/3.4.1/gradle-3.4.1.jar Required by: project : Add Google Maven repository and sync project Open File Enable embedded Maven repository and sync project先点Add Google Maven repository and sync project就行。还有错,直接用正确的build.gradle把整个替换掉。有什么错,改什么就可以了。
下面是我的尝试,可以不看:
我的C:\Program Files\Android\Android Studio\gradle\m2repository\com\android\tools\build\gradle\3.4.1也存在啊???

切换一个试试,我下载了3个版本,换成2.3.2:

classpath 'com.android.tools.build:gradle:2.3.2'
报另外一个错误:

不换版本,仿照正确的文件:

4、报错
Configuration 'compile' is obsolete and has been replaced with 'implementation' and 'api'.
It will be removed at the end of 2018. For more information see: http://d.android.com/r/tools/update-dependency-configurations.htmlcompile已经不再使用了,最新得用implementation
直接用正确的build.gradle把整个替换掉。有什么错,改什么就可以了。
5、minSdkVersion,targetSdk
The minSdk version should not be declared in the android manifest file. You can move the version from the manifest to the defaultConfig in the build.gradle file.
Open Manifest File Remove minSdkVersion and sync project The targetSdk version should not be declared in the android manifest file. You can move the version from the manifest to the defaultConfig in the build.gradle file.解决:manifest.xml删除 这类minSdkVersion,targetSdk就行。
6、v4jar包keyeventcompat不存在的错误
Error:(30, 31) 错误: 找不到符号
符号: 类 KeyEventCompat位置: 程序包 android.support.v4.view
解决:KeyEventCompat类被取消了 hasNoModifiers方法已经被KeyEvent实现了
把
if (KeyEventCompat.hasNoModifiers(event)) { handled = arrowScroll(FOCUS_FORWARD);} else if (KeyEventCompat.hasModifiers(event, KeyEvent.META_SHIFT_ON)) { handled = arrowScroll(FOCUS_BACKWARD);} 改为
if (event.hasNoModifiers()) { handled = arrowScroll(FOCUS_FORWARD);} else if (event.hasModifiers(KeyEvent.META_SHIFT_ON)) { handled = arrowScroll(FOCUS_BACKWARD);} 7、报错:
ERROR: Plugin with id 'kotlin-android' not found. Open File
两个全部替换就行。
8、Could not find com.android.tools.build:aapt2:3.2.1-4818971.
Android Studio升级到3.2.1后,运行项目报如下错:
Could not find com.android.tools.build:aapt2:3.2.1-4818971.Searched in the following locations: file:/D:/AndroidStudio/sdk/extras/m2repository/com/android/tools/build/aapt2/3.2.1-4818971/aapt2-3.2.1-4818971.pom file:/D:/AndroidStudio/sdk/extras/m2repository/com/android/tools/build/aapt2/3.2.1-4818971/aapt2-3.2.1-4818971-windows.jar file:/D:/AndroidStudio/sdk/extras/google/m2repository/com/android/tools/build/aapt2/3.2.1-4818971/aapt2-3.2.1-4818971.pom file:/D:/AndroidStudio/sdk/extras/google/m2repository/com/android/tools/build/aapt2/3.2.1-4818971/aapt2-3.2.1-4818971-windows.jar file:/D:/AndroidStudio/sdk/extras/android/m2repository/com/android/tools/build/aapt2/3.2.1-4818971/aapt2-3.2.1-4818971.pom file:/D:/AndroidStudio/sdk/extras/android/m2repository/com/android/tools/build/aapt2/3.2.1-4818971/aapt2-3.2.1-4818971-windows.jar https://jcenter.bintray.com/com/android/tools/build/aapt2/3.2.1-4818971/aapt2-3.2.1-4818971.pom https://jcenter.bintray.com/com/android/tools/build/aapt2/3.2.1-4818971/aapt2-3.2.1-4818971-windows.jarRequired by: project :app
解决方法:
在项目的build.gradle文件中,新增一行google()即可解决
allprojects {
repositories { jcenter() google()//新增这一行 } }9、导入项目,同步时提示SSL peer shut down incorrectly
原因:Android Studio在同步代码的时候会根据代码中的配置下载对应版本的Gradle文件
配置文件:gradle-wrapper.properties
distributionUrl=https\://services.gradle.org/distributions/gradle-5.1.1-all.zip
解决方法与上面的(1、Failed to open zip file问题)一样。改成你已经下载的。
10.Application installation failed Instant Run问题
提示:
或者
Installation failed with message Failed to finalize session: INSTALL_FAILED_TEST_ONLY:installPackageLI.
It is possible that this issue is resolved by uninstalling an existing version of the apk if it is present, and then re-installing.
WARNING: Uninstalling will remove the application data!
Do you want to uninstall the existing application?
解决:
方案四:点击File->Setting->Build,Execution,Deployment->Instant Run,将enable instant run... 的勾去掉。

方案二:这有可能是模拟器(手机)上原来安装过同名app但是签名等不一样,在手机上删除该app即可。
方案三:点击Build->Clean Project,然后再次Build->Rebuild Project即可。
11、导入项目,同步时提示
Cause: org.jetbrains.plugins.gradle.tooling.util.ModuleComponentIdentifierImpl.getModuleIdentifier()Lorg/gradle/api/artifacts/ModuleIdentifier;
原因:Android studio的版本太低,与当前下载的gradle版本无法兼容导致的,只要下载Android studio当前版本的或低一点的版本gradle就可以了。
解决:在Android studio新建一个Android 项目如果正常,将新建的项目的
gradle-wrapper.properties 文件中distributionUrl ,修改到你出问题的项目中
12.Google库加载不下来的问题,一直在加载,加载慢。同问题1。
其实我们可以给dl.google.com设置个代理,然后库都能正常加载下来了。步骤如下:
- 打开站长工具网站,
- 找到 ping测试,输入dl.google.com,执行ping测试

- 网页往下翻,随便拿到个ip地址,如203.208.41.70

- 修改host文件,windows进入C:\Windows\System32\drivers\etc,打开host文件,在文件最末尾加入203.208.41.70 dl.google.com
此时进入项目重新同步下,库就可以正常加载下来了。
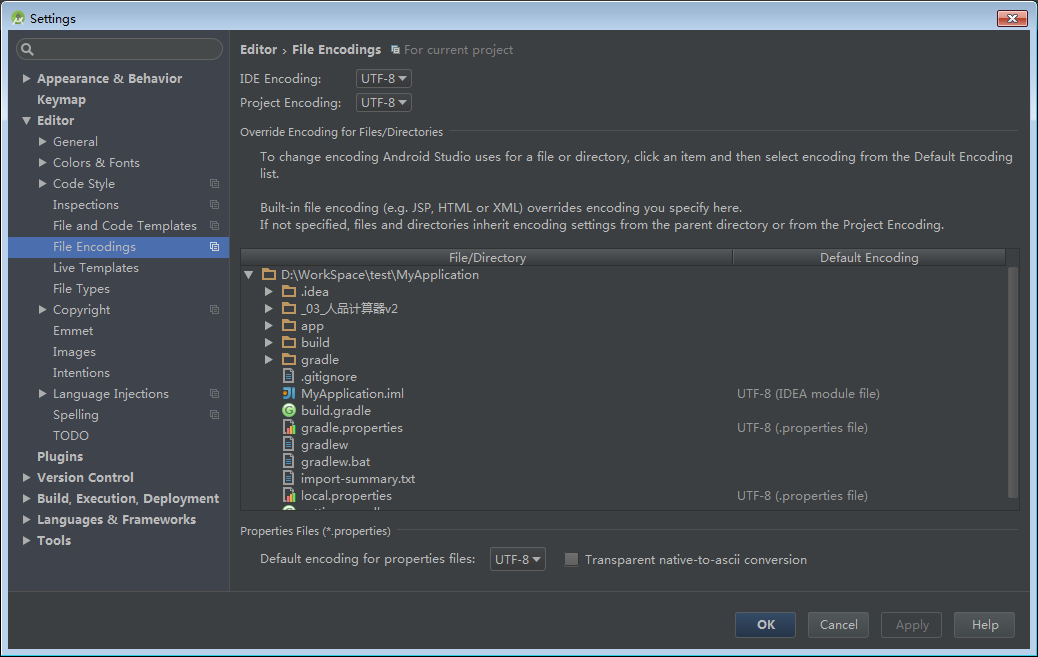
13.android studio 设置编码UTF-8,UTF-8乱码。
1.打开File->Setting->Editor->File Encoding 进行编码设置
这里面主要有4块
IDE Encoding:ide 的编码
Project Encoding:项目的编码
File or Director Encoding:各个文件或者目录的编码
Property File Encoding:属性文件的编码
如果各个文件或者目录没有指定编码,默认使用 Project 的编码,如果 Project 没有加载的时候没有指定编码,默认使用 IDE 的编码,属性文件不能单个文件指定编码,只能通过 Property File Encoding 统一指定编码。
如果设为utf-8提示乱码,全部设为GBK.
2.打开module的 build.gradle 文件修改编译器使用的编码
经过上面的设置,只能影响你在 IDE 里面编辑器视图里面看到的文件内容的编码。编译器使用的编码还需要单独设置,否则 gradle 默认使用 utf-8 的编码和文件的实际编码不一致,就会导致程序运行的时候显示乱码。
android {
compileOptions {
encoding "GBK"
}
}
13.按默认导入,time out超时,再同步也超时。用第一步覆盖两文件,同步成功。但提示编译时提示“Compilation failed; see the compiler error output for details.”
更细一步,更莫名其妙:org.gradle.internal.exceptions.LocationAwareException: Execution failed for task ':app:compileDebugJavaWithJavac'.
at org.gradle.initialization.exception.DefaultExceptionAnalyser.transform(DefaultExceptionAnalyser.java:99) at org.gradle.initialization.exception.DefaultExceptionAnalyser.collectFailures(DefaultExceptionAnalyser.java:65) at org.gradle.initialization.exception.MultipleBuildFailuresExceptionAnalyser.transform(MultipleBuildFailuresExceptionAnalyser.java:39) at org.gradle.initialization.exception.StackTraceSanitizingExceptionAnalyser.transform(StackTraceSanitizingExceptionAnalyser.java:29) at org.gradle.initialization.DefaultGradleLauncher.finishBuild(DefaultGradleLauncher.java:174) at org.gradle.initialization.Defau………………原因:这可能是版本不一致造成的。因为新建的项目配置文件版本高且加了许多东西。
解决方法:build.gradle文件(Module:app)改回到导入时默认的。就可以了。
